
Full HTC Vive 3D Movie HOWTO Guide
Preparation:
1. Best HTC Vive Video Converter- Watch 3D videos on HTC Vive
Watching VR video on HTC Vive is a good taster of Virtual Reality within budget. Can any 3D video be viewed on HTC Vive? No. But with HTC Vive Video Converter- Dimo Video Converter Ultimate, you can watch any 3D movies on HTC Vive without error.
With it, you are able convert unsupported 3D movies including 3D Blu-ray to SBS 3D MP4 files for playback on HTC Vive in just few clicks. It has the most amazingly easy to operate interface. Even freshers, who have no information on how to convert 3D movies to HTC Vive supported format, can quickly finish the 3D video conversion by following the guide. It supports not only HTC Vive, but also all VR headsets like Gear VR, VR One, Rift DK2, Google Cardboard, etc. and mainstream 3D TV, 3D media players! By the way, thanks to its advanced NVIDIA CUDA technology, you'll going to process your conversion at 6X faster speed while retaining excellent output quality.
If you are a Mac user, you can turn to Dimo Video Converter Ultimate for Mac (OS Sierra, El Capitan included), which has the same function as the Windows version.
Free Download Dimo Video Converter Ultimate (Win/Mac):


Other Download:
- Cnet Download: http://download.cnet.com/Dimo-Video-Converter-Ultimate/3000-2140_4-77472903.html
- Soft32 Download: http://dimo-video-converter-ultimate.soft32.com/
- Top4download: http://www.top4download.com/dimo-video-converter-ultimate/nsyrihrb.html
- Softpedia Download: http://www.softpedia.com/get/Multimedia/Video/Encoders-Converter-DIVX-Related/Dimo-Video-Converter-Ultimate.shtml
- windows7download: http://www.windows7download.com/win7-dimo-video-converter-ultimate/bpphgnww.html
2. Buy/Download a 3D movie that is in these formats:
.mp4 .m4v .3gp .3g2 .ts .webm .mkv .wmv .asf .avi .flv. In my opinion, .mp4 is best, while audio is aac.
3. A VR player app
a. Whirligig
To watch a video, click the Browse button in the top left-hand corner of the menu. You'll be able to browse your hard drive to choose a video file. (Whirligig also claims to support YouTube links in its Settings, but I couldn't get that to work at the time of this writing.)

As the video starts to play, you'll probably want to adjust some settings using Whirligig's heads-up controls. Here's what we recommend for each type of video:
- Regular 2D video: Set Projector to Cinema or Cinema Curved.
- 3D video: 3D video comes in a few different forms, so check the video you downloaded–or the settings you used when you ripped it–to see whether it's Half Side-By-Side, Full Side-By-Side, Half Over-Under, or Full Over-Under. Set the Projector to either Cinema or Cinema Curved, then select SBS or OU instead of Mono. If the video is Half SBS, set Stretch to "100" so it displays in the proper aspect ratio.
- 180 or 360 degree video: The video will usually tell you whether it's 180 degrees or 360 degrees on the site you download it from. If it's 180 degrees, set Projector to "Fisheye" and set FOV to 180. If it's 360, set Projector to "Barrel" and FOV to 360. You may also have to tweak "Tilt" for 180 videos or "Rotation" for 360 videos so that the video is facing the right direction.
- Full VR video: Combine the correct settings from "3D video" and "180 or 360 degree video" sections of this list. You can also adjust the Scale and Distance settings to fit your tastes, or click the Settings cog in the lower right-hand corner for even more options. Whirligig also has some other cool features like saving different presets, but these basics should get you up and running pretty quickly. For now, sit back and enjoy the movie!
Download and Install Virtual DesktopFirst, download and install the Virtual Desktop from Steam. The cost is $14.99, but well worth it. If your target price is, well, free, then you can download the free GoPro VR player from Kolor. However, you need to start and stop the videos on your desktop monitor and is not entirely VR integrated.
Setup Virtual DesktopThe first thing to do is determine how BIG you want your desktop. The app lets you fully customize the size of the desktop. You can even specify with a simple slider control all the way up to 360 degrees which wrap the entire desktop around you. Although neat, 360 degrees is not too practical. Personally, I like 180 degrees with a screen distance around 3 meters.

Playing 360/SBS Videos
Now you have the virtual desktop installed and setup, playing 360 videos is easy! Just click the 360 Videos option (top right), then browse to your video. Depending on the video format, you will need to change the Video mode. If you see the image duplicated on the left and the right, then select Side By Side (SBS). If you're unsure which format you need, then just click the option until the video looks good. Very few videos these days are 180 degrees, most are 360 degrees in the video projection option.

Steps to convert unsupported 3D videos to play on HTC Vive
Step 1. Load your 3D movies
Launch the video converter for HTC Vive, and click "Add file" button to import your source 3D materials. Or insert the Blu-ray disc to the Blu-ray Disc drive and click the "Add Blu-ray" button to have movies uploaded to the Blu-ray Ripper.
Step 2. Select output format
Click "Format" and select "MP4" from "Format > Video" category as the output format. It works on HTC Vive perfectly.
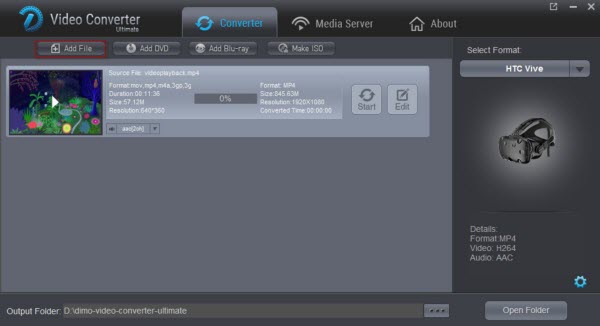
Tip: Click Settings to adjust the parameters like video codec, video bitrate, video frame rate, audio sample rate, audio channel. 1920x1080 compressed side-by-side 3D should be resampled to 1920x540 resolution full side-by-side resolution. And keep audio in AAC or MP3.
Step 3. Select 3D mode
Once you have gained proper information about video types then it is time to set a mode as per your video type so that it can work perfectly on your VR headset. The selection can be done as below:
To get a SBS (Side-by-side) video, click "Edit", turn to "3D" and choose "Left/Right" mode. Finally hit OK button.

Step 4. Start conversion
Click the "Start" button to start and finish the 3D video to HTC Vive conversion. After the conversion, click "Open" button to quickly locate the generated media file. Now you can transfer the converted 3D videos to play with HTC Vive using the above methods easily.
Free Download or Purchase Dimo Video Converter Ultimate:


Kindly Note:
The price of Dimo Video Converter Ultimate for Windows is divided into 1 Year Subscription, Lifetime/Family/Business License: $43.95/Year; $45.95/lifetime license; $95.95/family license(2-4 PCs); $189.95/business pack(5-8 PCs). Get your needed one at purchase page.
Contact us or leave a message at Facebook if you have any issues.
Related Articles:
No comments:
Post a Comment